
Last updated February 2025
Overview
This section delves into specific scenarios where Bloomflow's Import feature could be useful. Before diving in, we recommend first reviewing the Overall flow of the Import process.
From importing new partners to updating existing opportunities or linking related items, these use cases offer practical, step-by-step guidance tailored to real-world needs for managing your Bloomflow portfolios.
With these use cases, you’ll learn to:
- Efficiently perform bulk imports tailored to your goals
- Avoid common pitfalls
- Validate your data accurately
Explore the scenarios that match your goals and leverage the tips and examples provided to ensure a seamless and effective import process.
1. Importing new opportunities in bulk [Create new items]
Scenario
Your team has identified potential partnership opportunities through recent scouting efforts and wants to import them into Bloomflow in bulk.
Steps
- Prepare Your Data
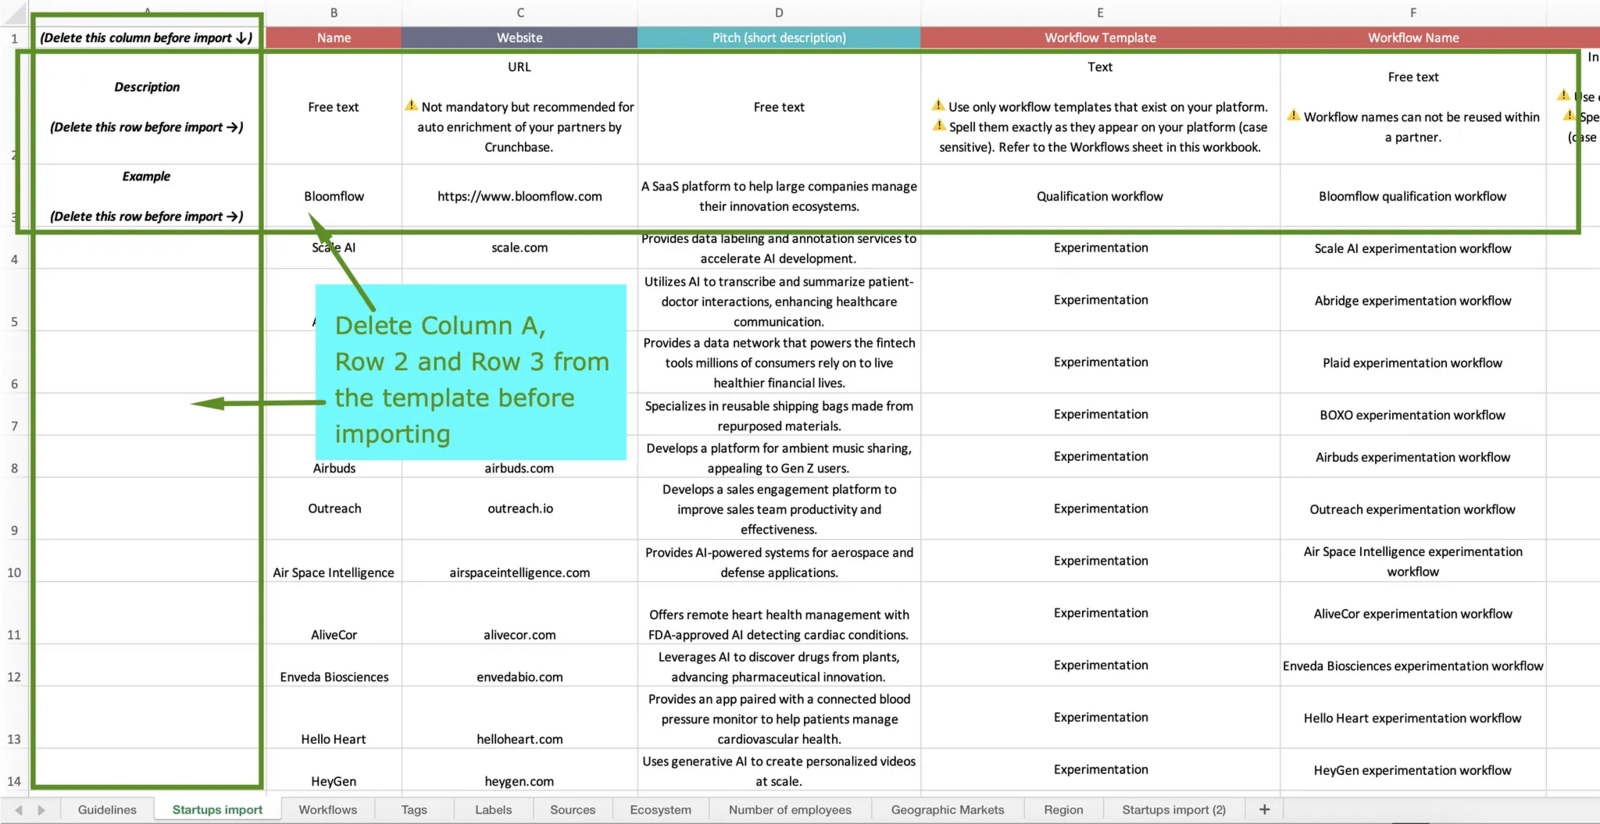
Customize a template from Import center that includes the fields relevant for your import. Populate the template with:
- Name: Acts as the unique identifier for each opportunity (required).
- Basic info: Website and Description
- Workflow info including Groups (teams in charge)
- Optionally include other fields relevant to the opportunity, such as:
- Structural info: Tags, Labels, Source etc.
- Additional info: Headquarters' location, Number of employees etc.
- Internal qualification info: Geographic Markets, Business Opportunity, Competitors etc.
- Contacts: Internal and external contact details.
- Custom fields: Specific to your portfolio configuration.
- Initiate import
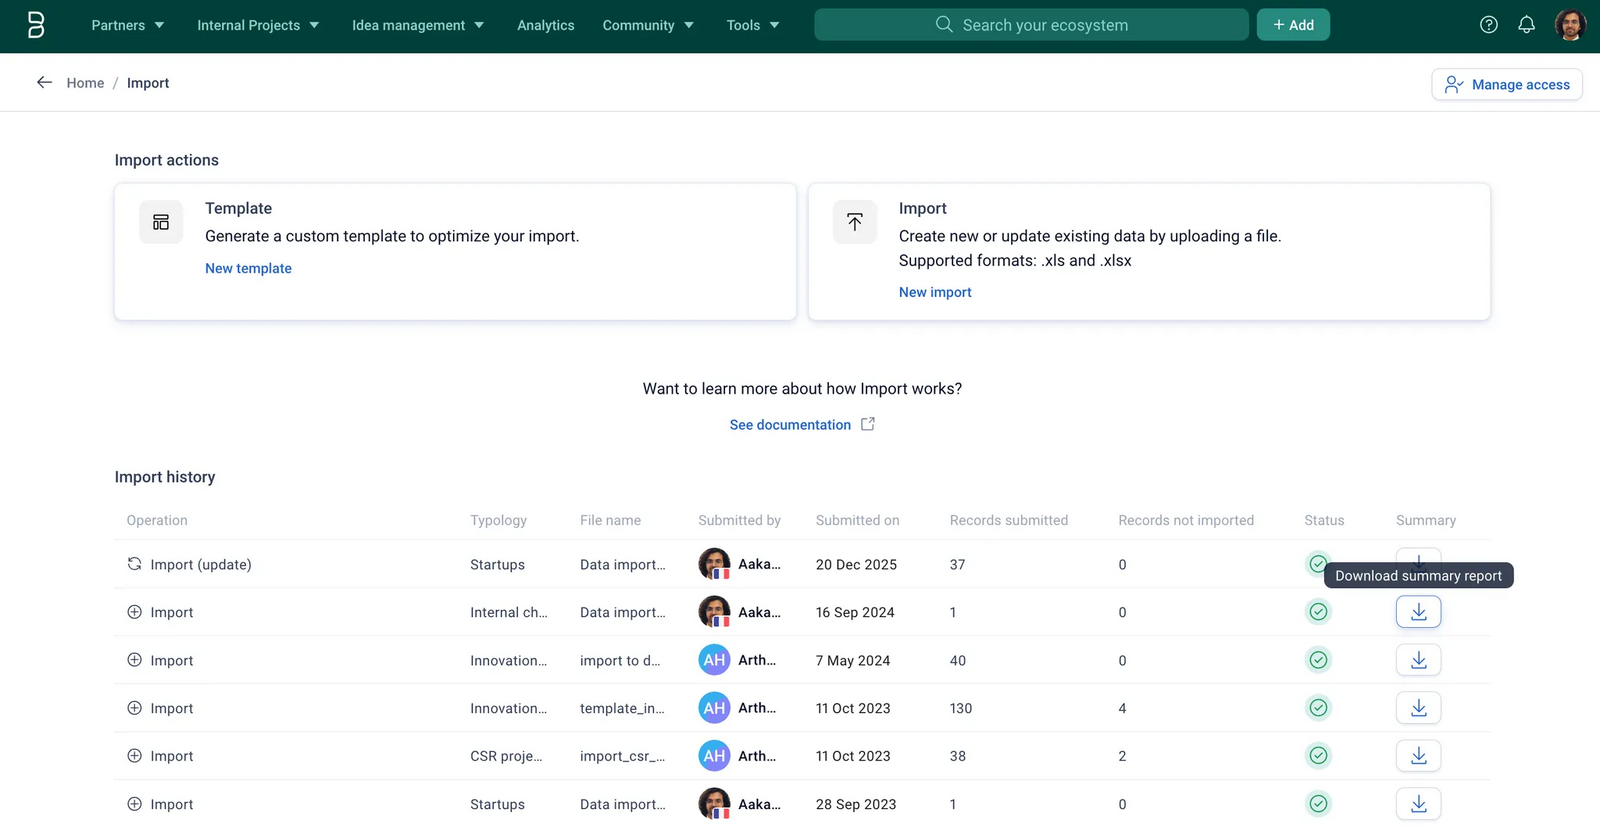
Go to Import Center (Tools menu (Navbar) > Import) > Import. Choose the appropriate typology (e.g., Startups), select the Create new operation and upload your Excel.
- Mapping
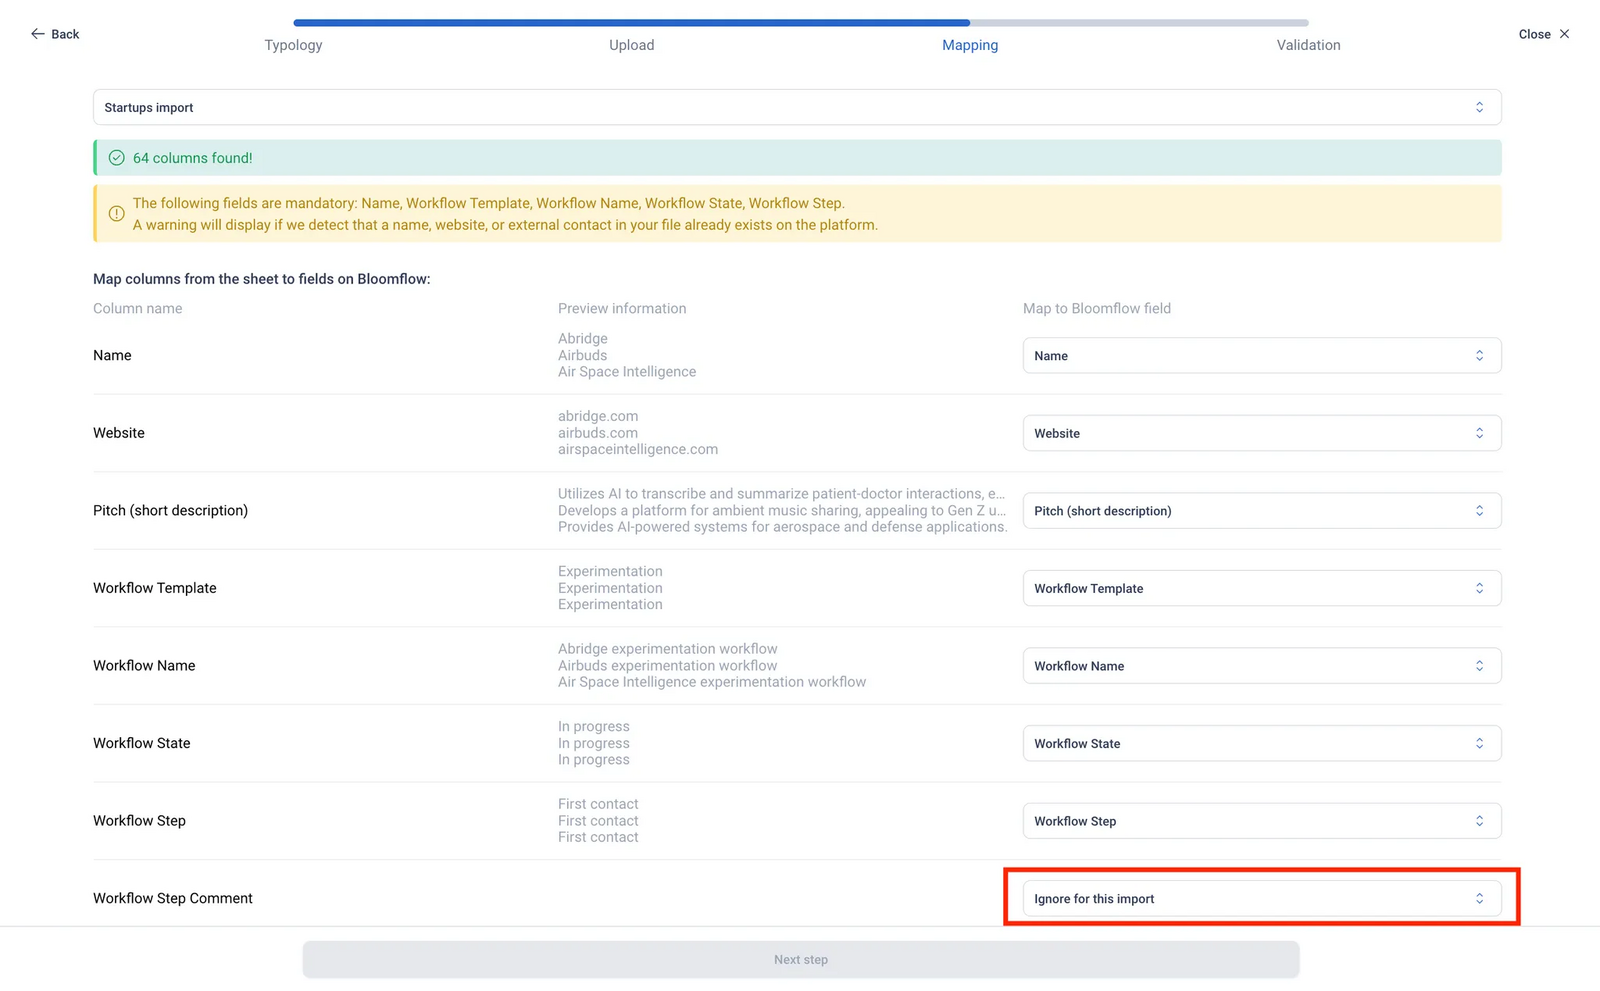
- On the Mapping screen, map your Excel "Column names" to "Bloomflow fields".
- Ensure Name and other relevant fields are correctly mapped. Mark any columns you do not wish to import as Ignore for this import.
- Validations
- Review the Validation summary for warnings or errors. Download the Validation report for detailed comments.
- Once the file is validated, proceed with the import.
Common Validation Warnings and Errors when creating new items
Errors (block the import):
>> Already exists on Bloomflow: *if a record with the same *Name already exists.
"Create new" operation lets you only create new items. If any matches are found on Bloomflow based on Name, you could possible use the "Update existing" operation to update the existing items.
>> Duplicates within file: if multiple records in your file share the same Name.
>> Missing values: for mandatory fields (e.g., Name, Workflow info).
>> Formatting error: for dates, URLs, phone numbers, or emails.
>> Unauthorized values: for preconfigured fields (e.g., Workflow Templates/States/Steps, Tags, Labels, Sources, etc.).
Warnings (do not block the import; recommended to review):
>> Missing Website: if Crunchbase auto-enrichment is enabled.
>> Match on Bloomflow: based on Website, SIRET, or External contact info.
>> Duplicates within file: based on Website, SIRET, or External contact info.
- Complete and Review
- Once the import is complete, review the Post-import summary for a detailed breakdown of imported and not imported records (if any).
- Verify that the workflows have been assigned correctly to the partners in your Bloomflow portfolio.
2. Importing and linking partners to existing innovation projects [Create new items]
Scenario
Your team identifies partners for innovation projects and needs to add them to Bloomflow while linking them to relevant projects with appropriate link statuses.
Steps
Learn more about the Ecosystem tab and how to use it in the documentation here.
- Prepare Your Data
Create an Excel with the following columns:
- Name (required; acts as the unique identifier for existing records).
- Additional details about the partners (e.g., Website, Description, Workflow info, Tags, etc.).
- Ecosystem (to specify the projects or items to link).
- Ecosystem Link Status (to qualify the relationship between the partner and linked project).
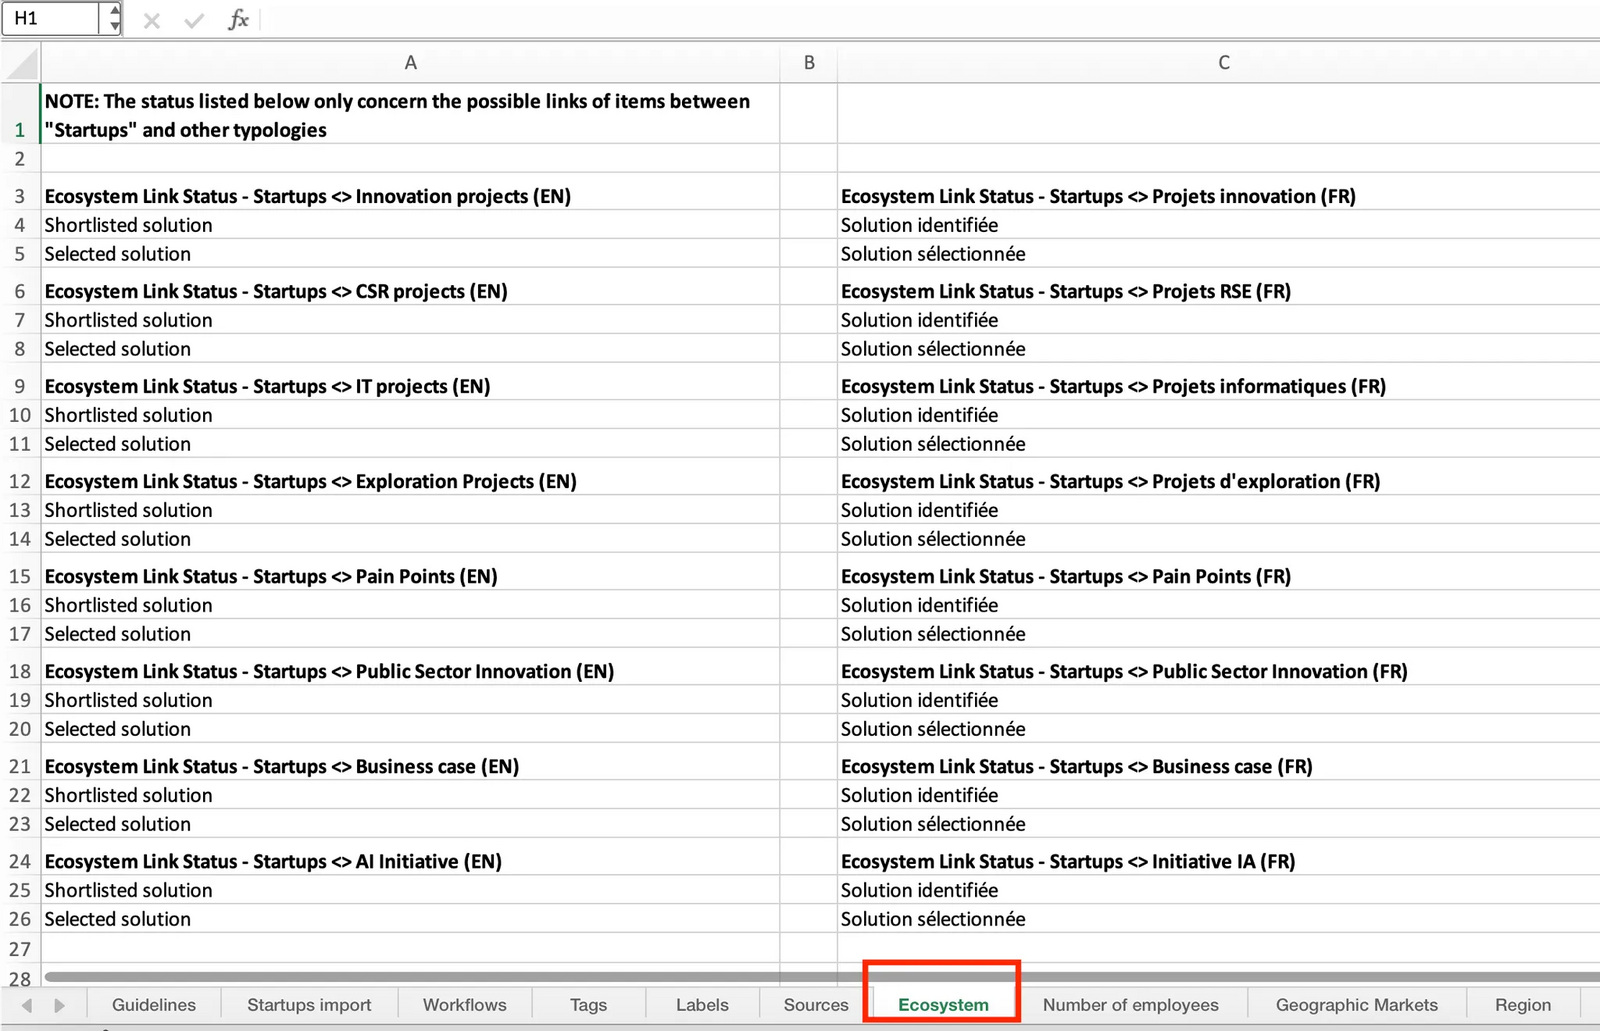
If you're using a custom template downloaded from Bloomflow, refer to the Ecosystem appendix sheet to find all valid Ecosystem Link Statuses between typologies.
Example:
- Link partner BOXO as a Shortlisted solution for the project Carbon Zero Initiative.
- Link partner Woola as:
- Selected solution for Carbon Zero Initiative.
- Shortlisted solution for Sheep Wool Packaging.
- Linked to another partner, Woolcool, without any link status.
Here’s how you would specify this in your import file:

- Initiate Import
Go to Import Center > Import. Choose the appropriate typology (e.g., Startups), select the Create new operation and upload the prepared file.
- Map and Validate
- On the Mapping screen, map "Column names" to "Bloomflow fields" . Ensure Name, Ecosystem and Ecosystem Link Status fields are mapped, along with other mandatory information to create new partners on Bloomflow.
- Mark any columns you do not wish to import as Ignore for this import.
- Address warnings or errors flagged during the validation step before proceeding.
Notes on warnings and errors when creating Ecosytem links via import:
>> The number of comma-separated items in Ecosystem must match the number of statuses in Ecosystem Link Status column.
>> Projects or items in Ecosystem must already exist in Bloomflow. If not, validations will block the import. In such cases, perform two imports:
- Create the projects with no Ecosystem data.
- Create partners and link them to the projects from the first import.
- Review and Verify
- Check the Post-import summary to ensure the import is successful.
- Navigate to the Ecosystem tab of a partner to verify links and statuses.
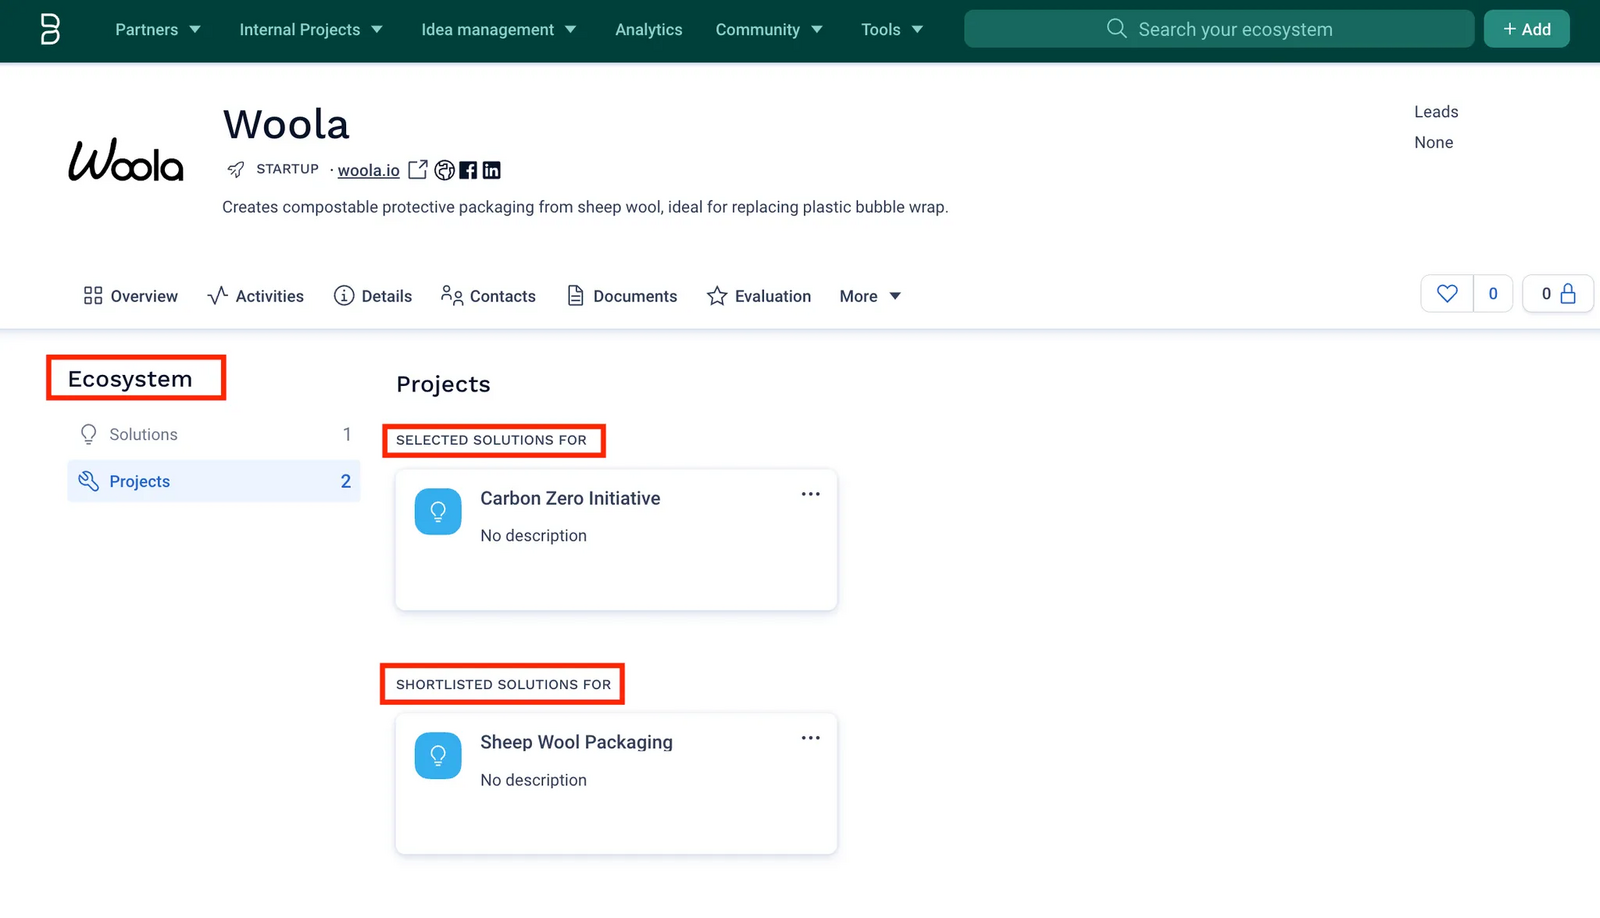
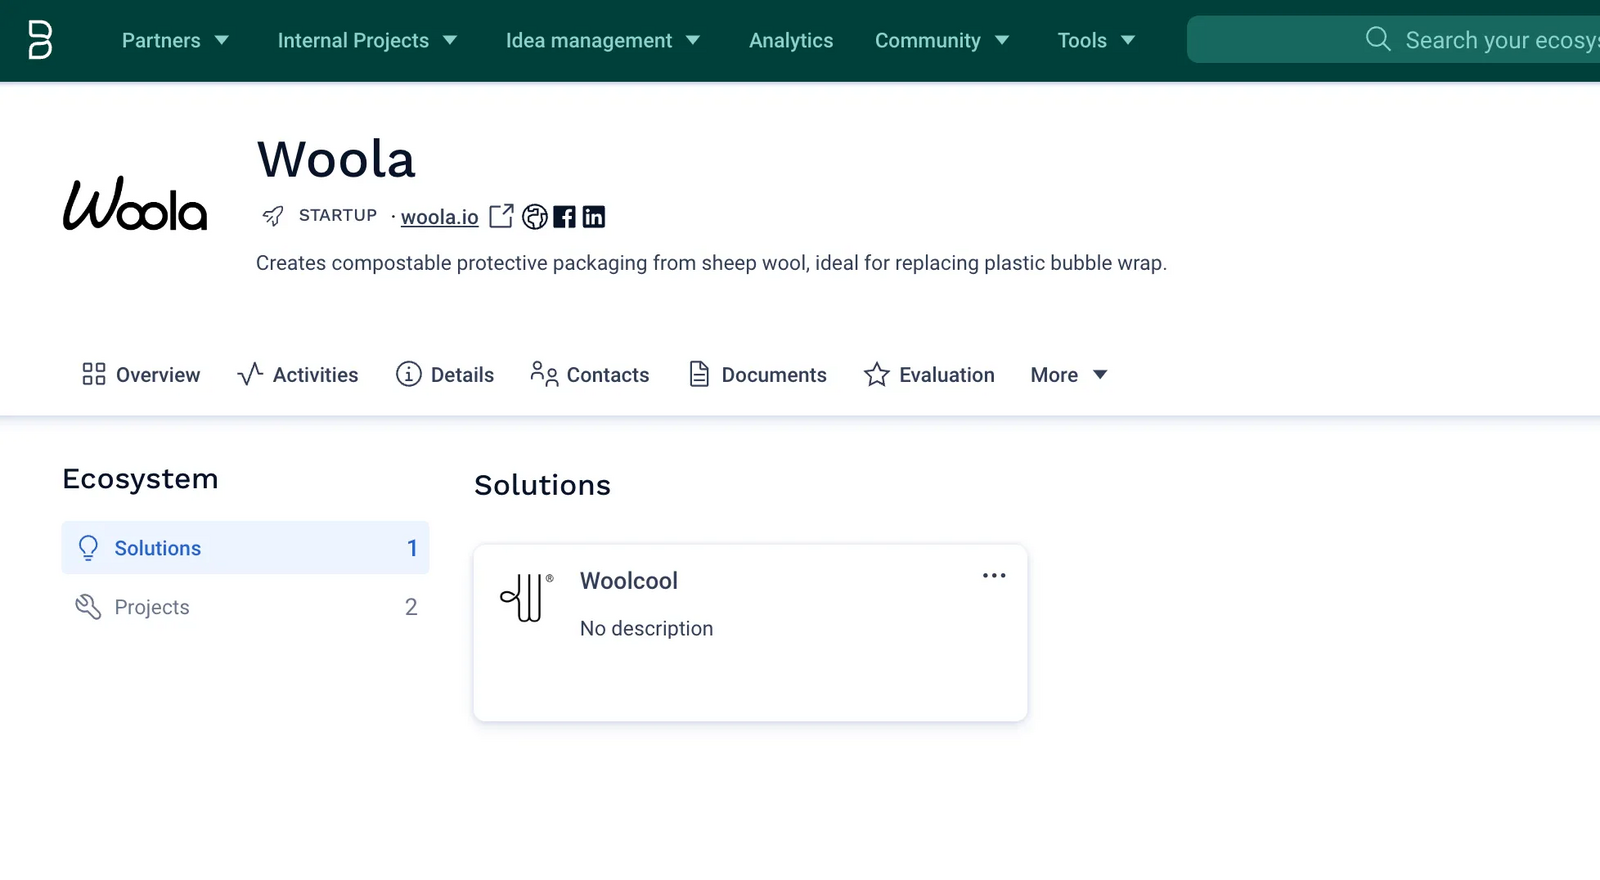
In the use case above, we linked existing projects on Bloomflow to newly created partners via Import. Similarly, you can also import projects—either by creating new ones or updating existing ones—while linking them to existing partners using the Ecosystem columns.
To update link statuses for already linked partners and projects:
- Use the Update existing option during import.
- Ensure the Name of the partner and the Name (in the Ecosystem column) of the project match:
>> If both names match, the Ecosystem Link Status is updated.
>> If there’s no match on the project name, a new link is created.
3. Adding custom info such as Budget details in bulk [Update existing items]
Scenario
You need to bulk-add Budget details for multiple innovation projects in your portfolio. Currently, these projects lack a Budget-related field.
Steps
- Request Field Setup
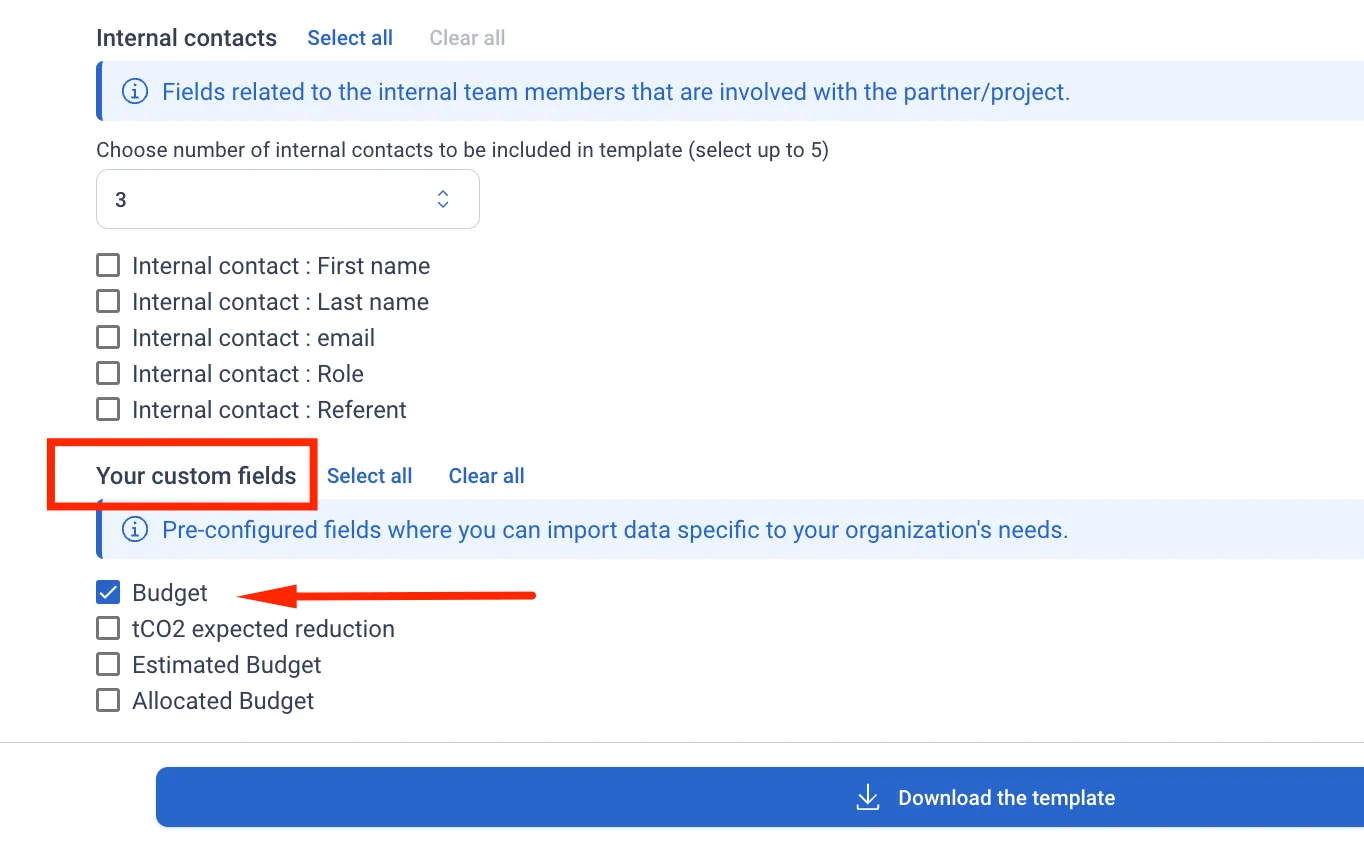
Contact your CSM to add a custom field (e.g., Budget) to the "Innovation Project" typology.
- Download the Updated Template
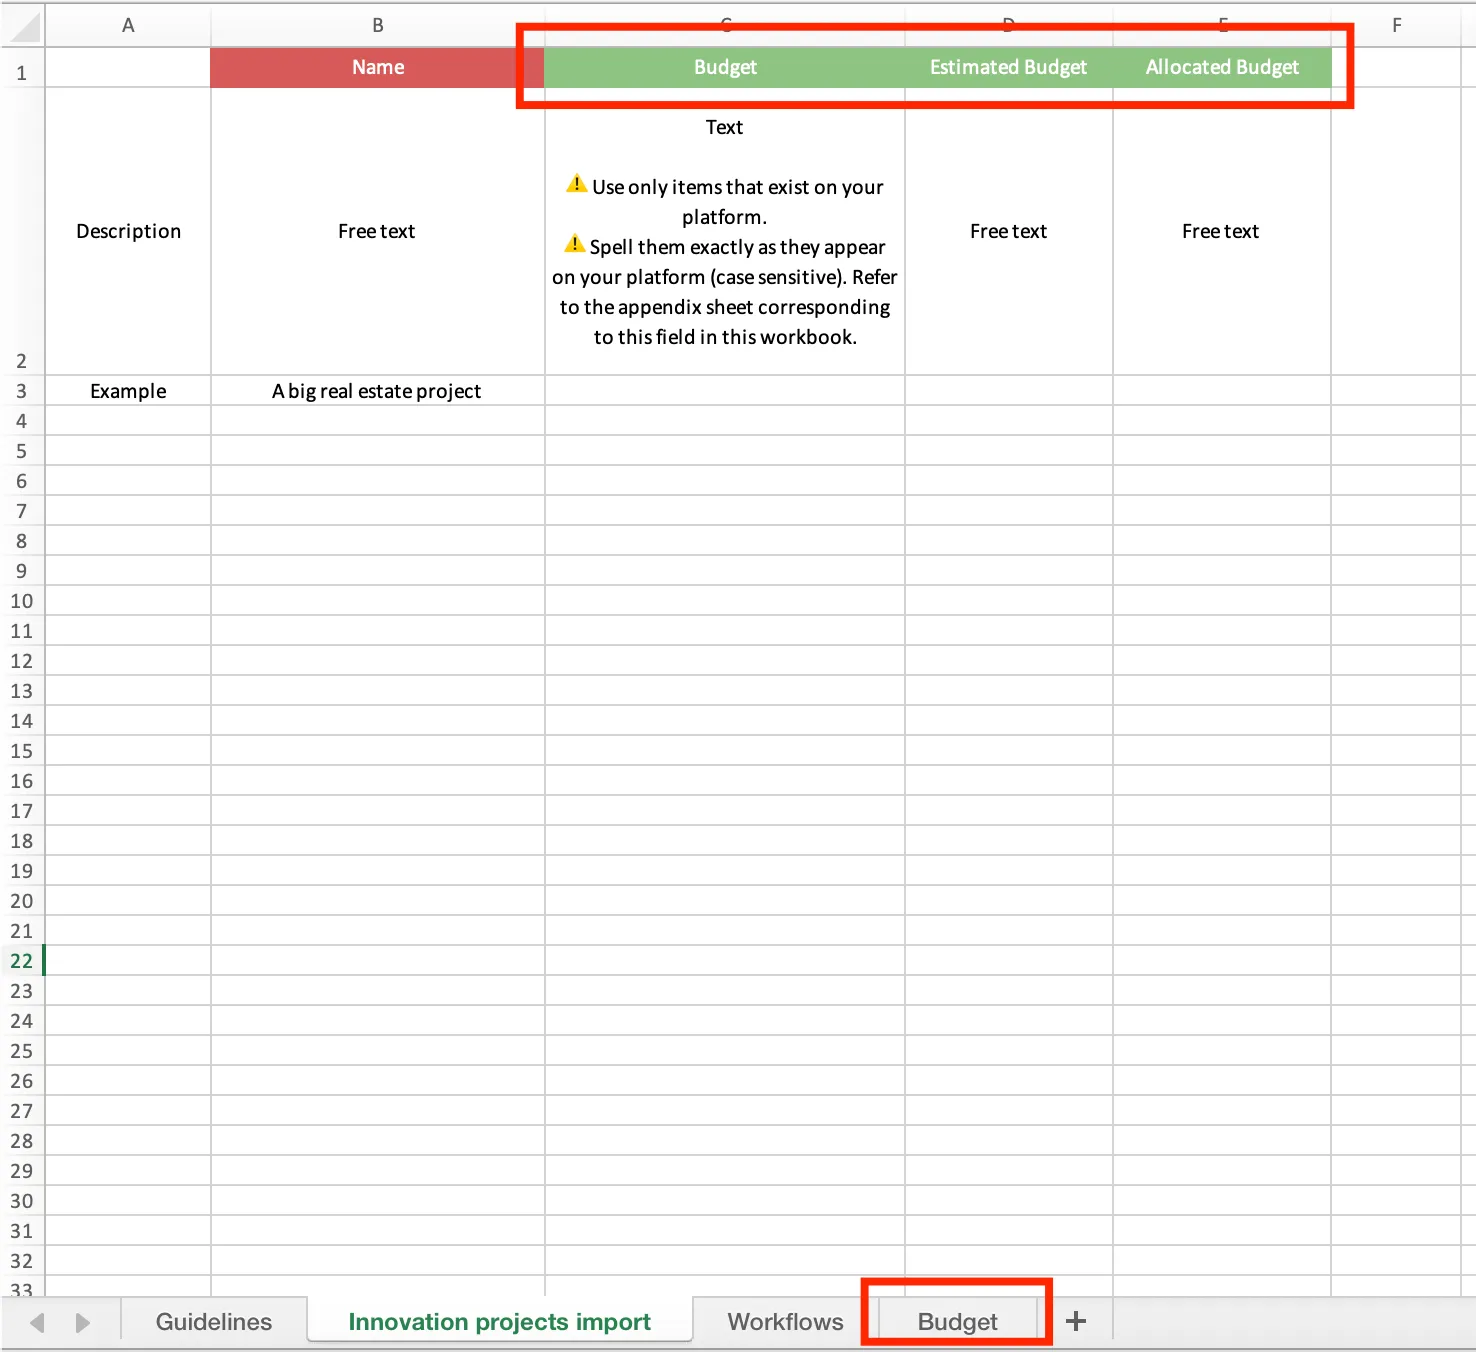
Customize a template from Import center that includes the newly added field. Custom fields are located at the end of the Excel template and highlighted for visibility.
- Prepare Data
Populate the template with:
- The Name of each project (serves as a unique identifier for import).
- Values for the Budget field (or other custom fields to be updated).
- Initiate Import
Go to Import Center > Import. Choose the appropriate typology (Innovation Projects), select the Update existing operation and upload your Excel.
- Map and Validate
- Map "Column Names" to "Bloomflow Fields" on the Mapping screen.
- Resolve any warnings or errors flagged during validation.
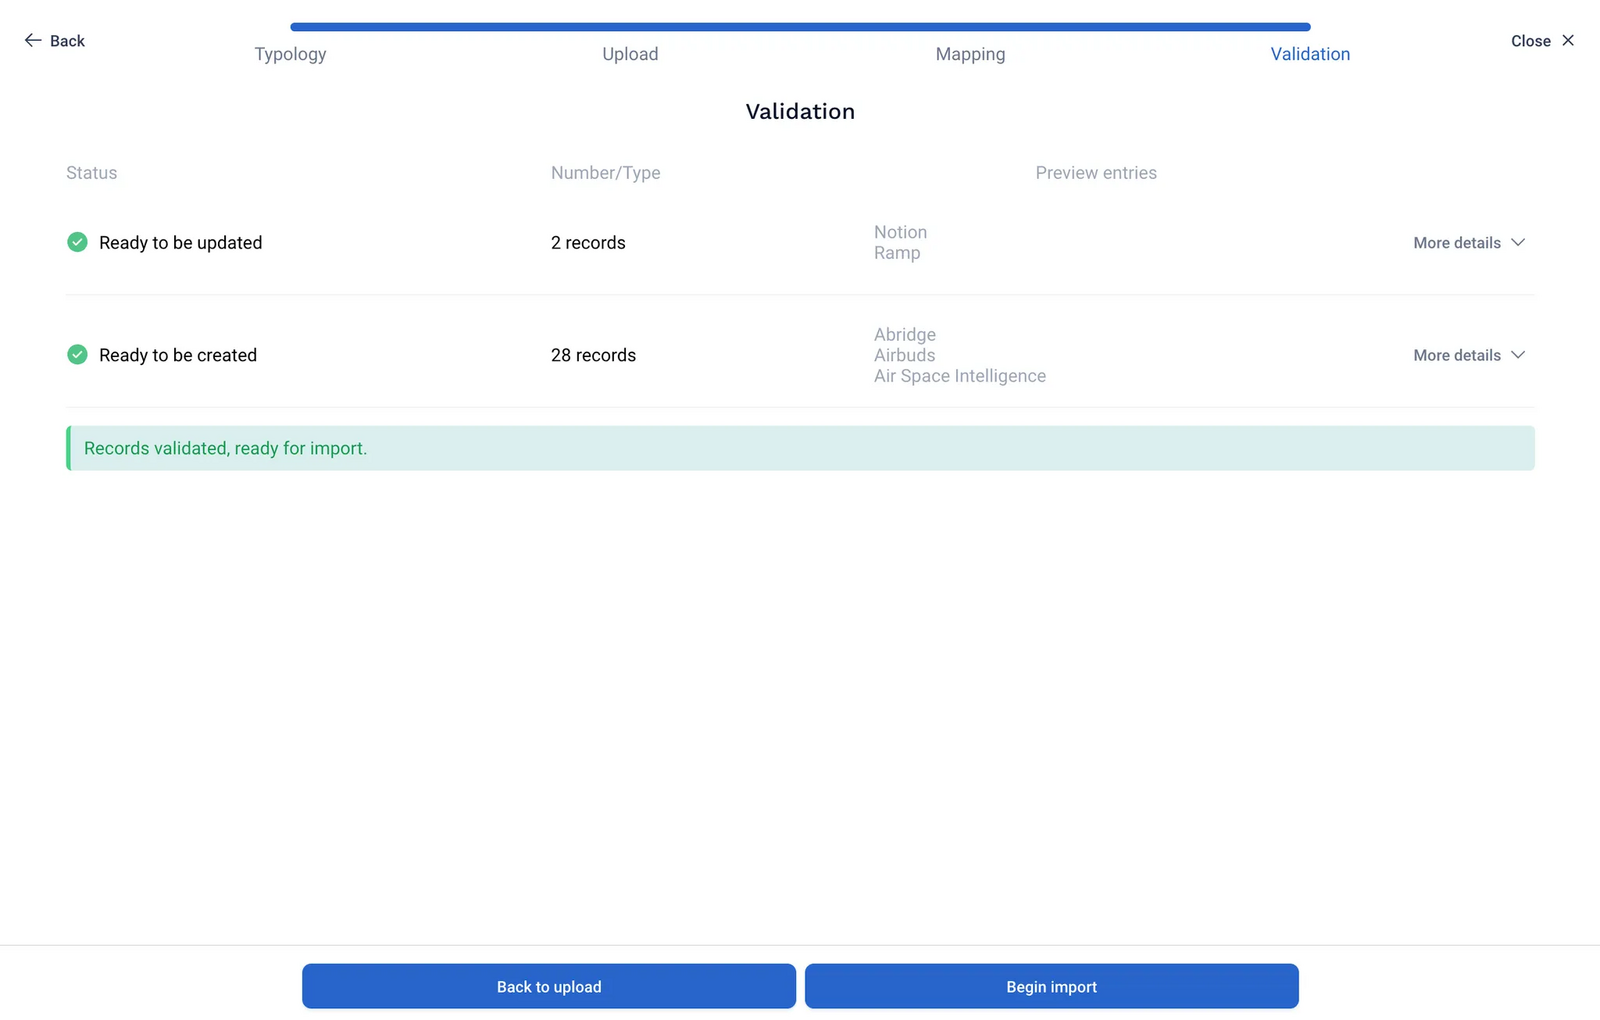
Note on the validation summary of Update existing flow:
- Records marked as Ready to be updated match existing items in Bloomflow by Name, and the items are updated with provided data. Learn more about update rules behind Bloomflow fields in Navigate Bloomflow Fields section.
- Records marked as Ready to be created will result in new items.
- Complete and Review
- Complete the import. Review the Post-import summary for a detailed breakdown of imported and not imported records (if any).
- Verify the updated custom field values in your portfolio.
4. Adding startups from an event, assigning the event as the Source, and updating existing startups on Bloomflow [Update existing items]
Scenario
You’ve attended an event and want to add several startups to Bloomflow, tagging the event as their Source. Some of these startups may already exist in your portfolio, and you wish to update their details instead of creating duplicate items.
Steps
Learn more about the Sources and how to use them in the documentation here. If certain sources don’t exist already, create them via Admin panel before the import.
- Prepare Your Data
Create an Excel file with the following columns: (You can also use an excel template customized from the Import center.)
- Name (required; acts as the unique identifier for existing records).
- Additional details for the startups (e.g., Website, Description, Tags etc.).
- Workflow information that may be mandatory while creating new partners.
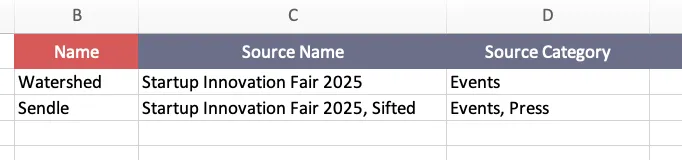
- Source Name and Source Category: Specify the event name (e.g., "Startup Innovation Fair 2025") and the category (e.g., "Events").
If you're using a template downloaded from Bloomflow, refer to the Sources appendix sheet to find the Source Names and their corresponding Source Categories configured for the relevant typology. To assign multiple sources to an item during import, list them in the respective columns ( Source Name and Source Category), separating each entry with a comma. Ensure both columns contain an equal number of items.
- Initiate Import
Go to Import center > Import. Choose the appropriate typology (e.g., Startups), select the Update existing operation and upload your Excel.
Use the Update existing operation instead of Create new to simultaneously create new items and update information for startups that may already exist in Bloomflow. Matches are determined based on the Name field.
- Map and Validate
- On the Mapping screen, map "Column names" to "Bloomflow fields" . Ensure Name, Source Name and Source Category fields are mapped, along with other mandatory information to create new startups on Bloomflow.
- Mark any columns you do not wish to import as Ignore for this import.
- Address warnings or errors flagged during the validation step before proceeding.
- Complete and Review
- Once the import is complete, review the Post-import summary for a detailed breakdown of imported and not imported records (if any).
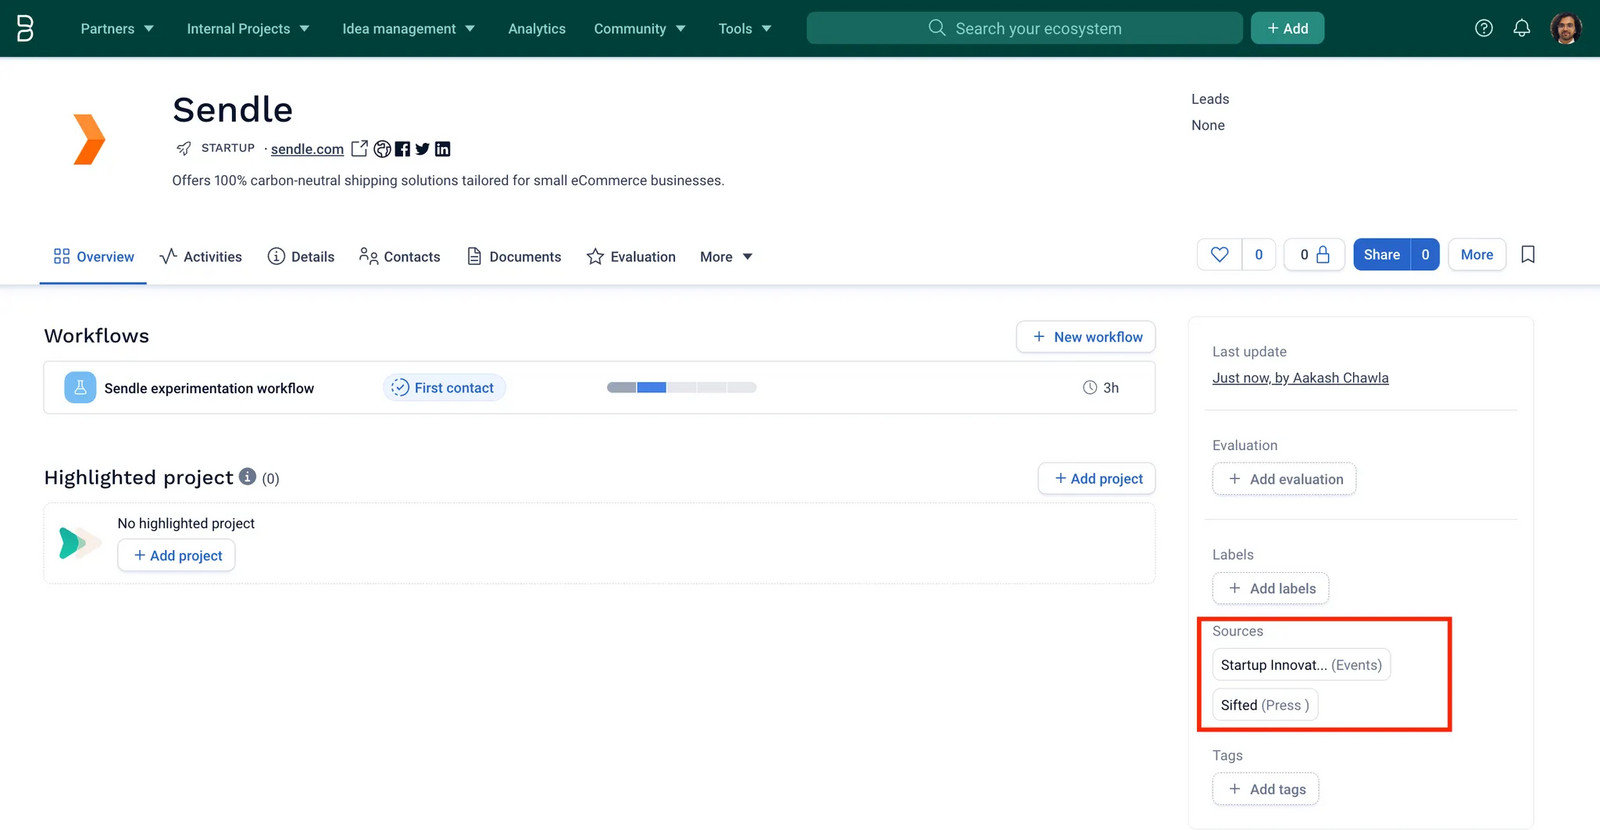
- Confirm that updates and new additions are reflected in your Bloomflow portfolio. Verify that the event has been correctly listed as the Source for the relevant startups.
5. Importing partners with multiple workflows or without workflows [Update existing items]
Scenario
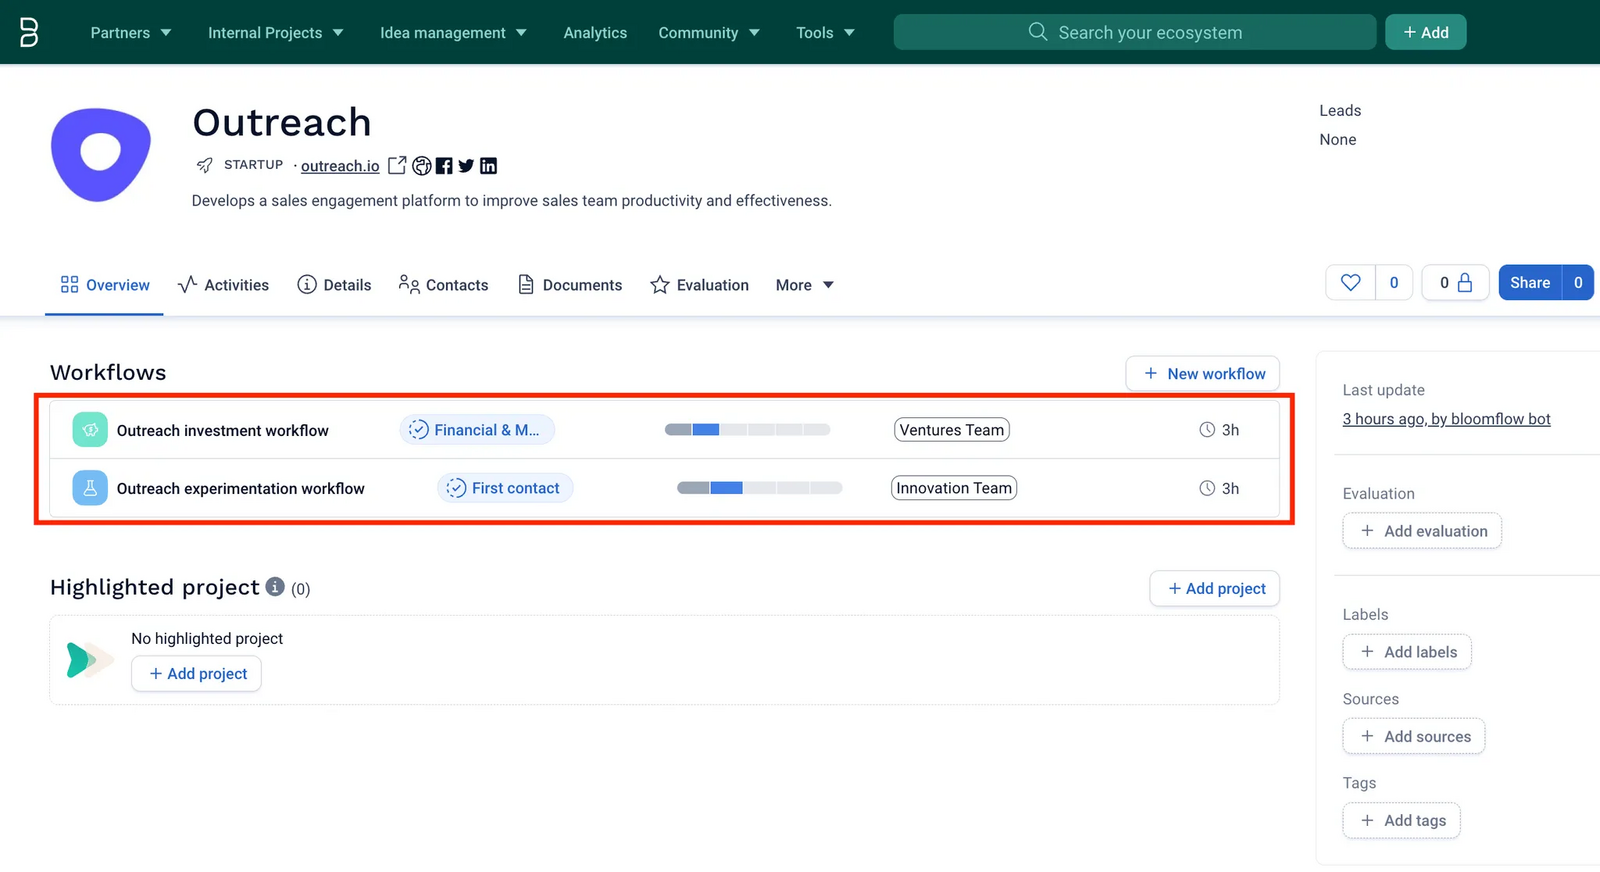
You’ve scouted strategic partners and want to add them to Bloomflow. Each partner needs to be assigned workflows customized for qualification, follow-up, and partnership, tailored to the engaging teams. Additionally, some partners may not require workflows at this stage.
Steps
Setup for multiple workflowsIf you’re not familiar with multi-workflows, get started here. Reach out to your Customer Success Manager should you like to enable multiple workflows for your partner portfolios.
- Prepare Your Data
Create an Excel file with the following columns: (You can also use a customized template from the Import Center.)
- Name (required; acts as the unique identifier for existing records).
- Additional details about the partners (e.g., Website, Description, Tags, etc.).
- The six fields that make up Workflow info:
- Workflow Name
- Workflow Template
- Workflow State (e.g., "In progress")
- Workflow Step (e.g., "Initial Contact")
- Groups
- Workflow Step Comment
If using a template downloaded from Bloomflow, consult the Workflows appendix sheet to find the predefined Workflow Templates and their corresponding Workflow Steps. This sheet also lists all possible Workflow States and Workflow Groups configured for the relevant typology.
- Initiate Import
Go to Import Center > Import. Select the Partner typology, choose the Update existing operation, and upload your Excel file.
Why use the Update existing operation?The Create new operation supports only one record per item in the import file. To add multiple workflows for the same item using a single Excel file, you’ll need multiple records with the same Name (of the item) but different Workflow Names. This flexibility is why the Update existing operation is used for imports involving multiple workflows.
- Map and Validate
- On the Mapping screen, ensure Name and all the Workflow related fields are correctly mapped.
- Map any additional fields required for creating new items. Mark any columns you do not wish to import as Ignore for this import.
- Address warnings or errors flagged during the validation step.
Notes on workflow-related warnings and errors when creating new items:
>> For importing workflows, Name (of the item) and Workflow Name together serve as unique identifiers. An item cannot have multiple workflows with the same Workflow Name.
>> Depending on your configuration, you may be allowed to create partners without workflows. If permitted, you can omit all 6 workflow-related fields. Otherwise, the following fields are mandatory for creating a workflow: Workflow Name, Workflow Template, Workflow State, and Workflow Step. Groups and Workflow Step comment fields are optional.
>> A Workflow State cannot be marked as completed unless it has reached the final step in its workflow.
- Complete and Review
- Once the import is complete, review the Post-import summary for a detailed breakdown of imported and not imported records (if any).
- Verify that the workflows have been assigned correctly to the partners in your Bloomflow portfolio.
6. Updating workflow info for partners in bulk [Update existing items]
Scenario
You want to update Workflow information for multiple partners in Bloomflow, such as changing their Workflow Step and adding a Workflow Step Comment.
Steps
- Prepare Your Data
Create an Excel file with the following columns (or download a customized template from the Import Center):
- Name (required; serves as the unique identifier for existing records).
- Workflow Name (required; identifies the specific workflow to update).
- Any fields you want to update, such as Workflow State (e.g., "In progress") and Workflow Step (e.g., "Negotiation").
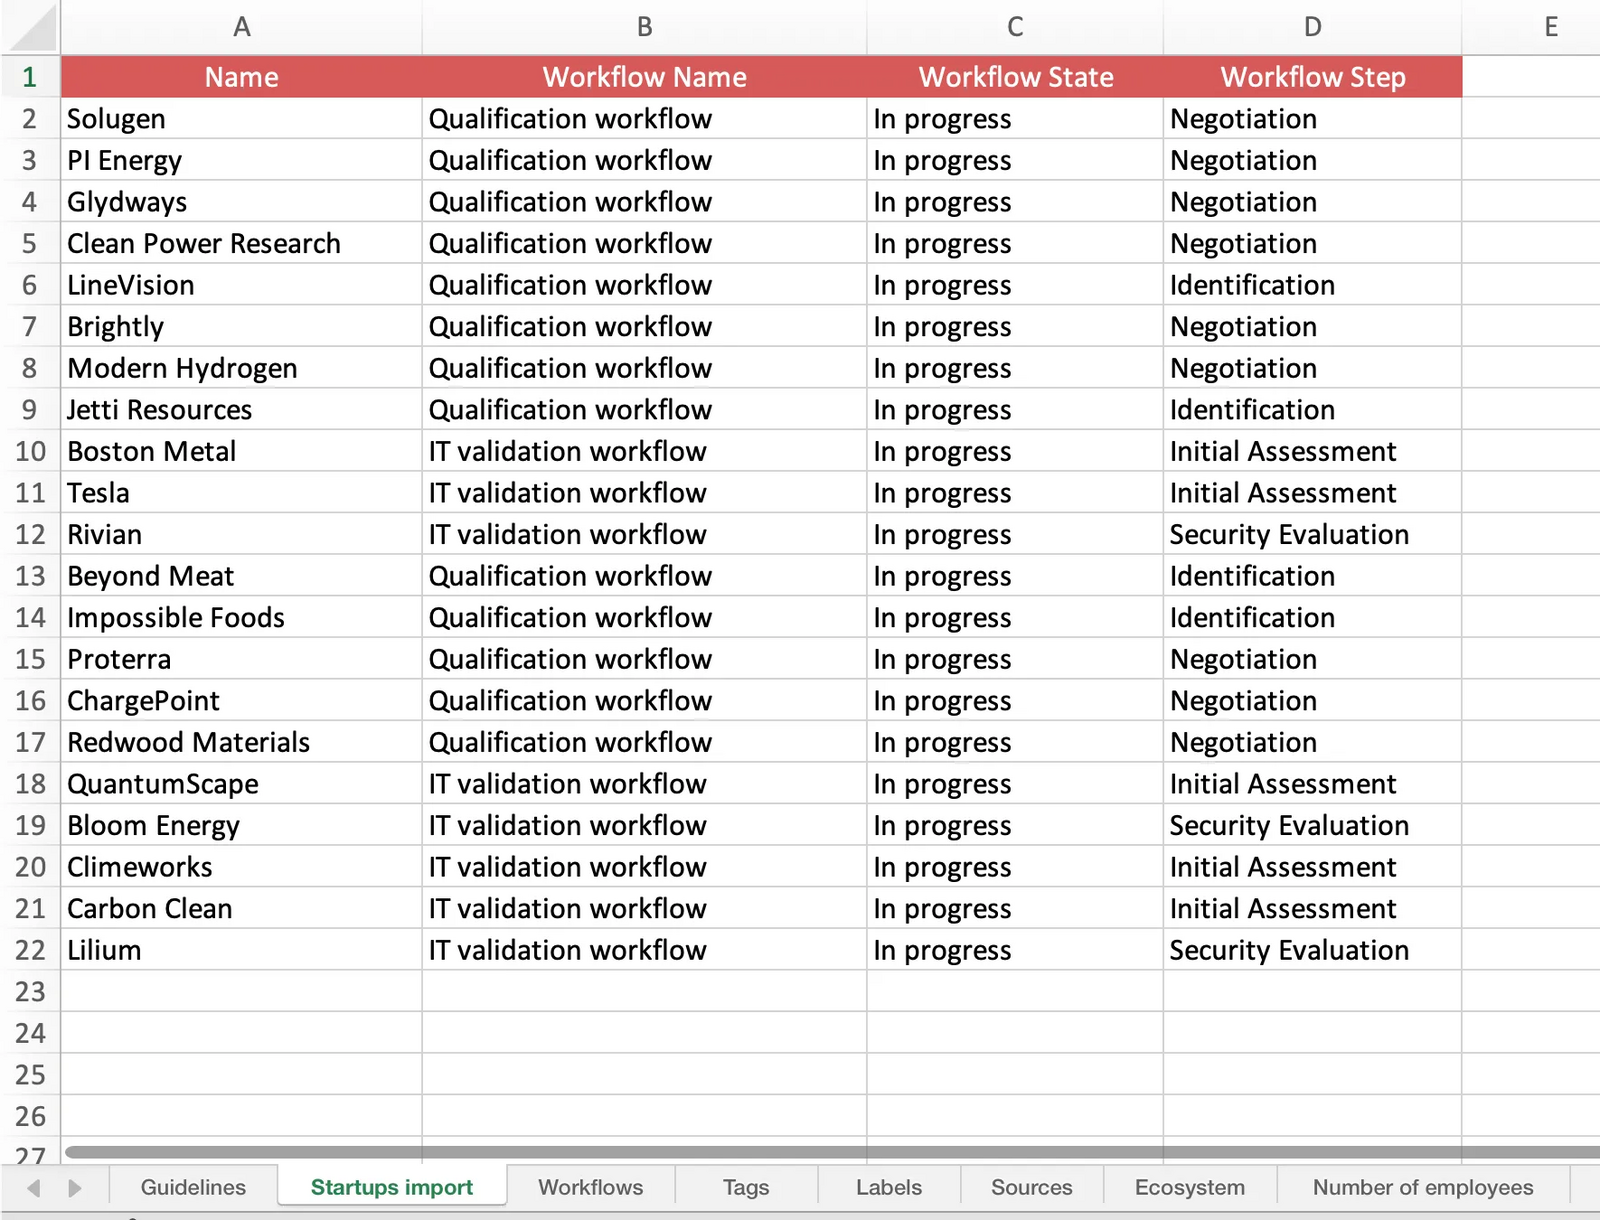
Note on possible updates via import to workflow-related fields:
>> Workflow Name: Identifies the specific workflow to update (along with the Name of the item); cannot be updated via import.
>> Workflow Template: Cannot be changed for existing workflows.
>> Workflow State: Replaced if a different state is provided.
>> Workflow Step: Replaced if a different step is specified (change history is stored).
>> Workflow Step Comment: Overwritten if associated with the current step. If the step is updated, the comment is linked to the new step.
>> Groups: New groups are appended to the existing list; groups already associated with the workflow cannot be removed via import.
- Initiate Import
Go to Import Center > Import. Select the Partner typology, choose the Update existing operation, and upload your Excel file.
- Map and Validate
- On the Mapping screen, ensure that the Name and Workflow Name fields are mapped correctly, along with any additional workflow-related fields you’re updating.
- Mark any columns you do not wish to import as Ignore for this import.
- Resolve any warnings or errors raised during the validation step.
Notes on workflow-related validations for updating existing items:
>> Updates to workflows are identified by matching both Name (of the item) and Workflow Name. If no match is found on Workflow Name, a new workflow will be added to the item.
>> Records flagged as Ready to be updated match existing items in Bloomflow by Name. If there’s also a match on Workflow Name, these records will show a Warning - others status on the Validation summary. Further, they have a Bloomflow comment in the Excel Validations Report: Match on Bloomflow - Workflow Name. Updates are applied only to records with both comments.
>> Duplicate records with the same Name and Workflow Name in the import file are not permitted.
>> A Workflow State cannot be marked as completed unless it has reached the final step in its workflow.
>> Updates cannot be processed if more than one workflow with the same name exists for a partner.
>> At least one Workflow State (either specified in Excel or existing in Bloomflow) must be In progress to update any other workflow-related field. The Workflow State itself is always updated.
>> If the current Workflow Template does not match the one in Excel, the update cannot proceed. To avoid issues, it’s recommended to skip this field when updating existing workflows.
- Complete and Review
- Once the import is complete, review the Post-import summary for details about successfully updated records and any errors encountered.
- Verify the changes by checking the updated workflow information for partners in your Bloomflow portfolio.
To find the Workflow Names required for your import, you can:
- Consult the Partner Page: Check directly on the relevant partner’s page.
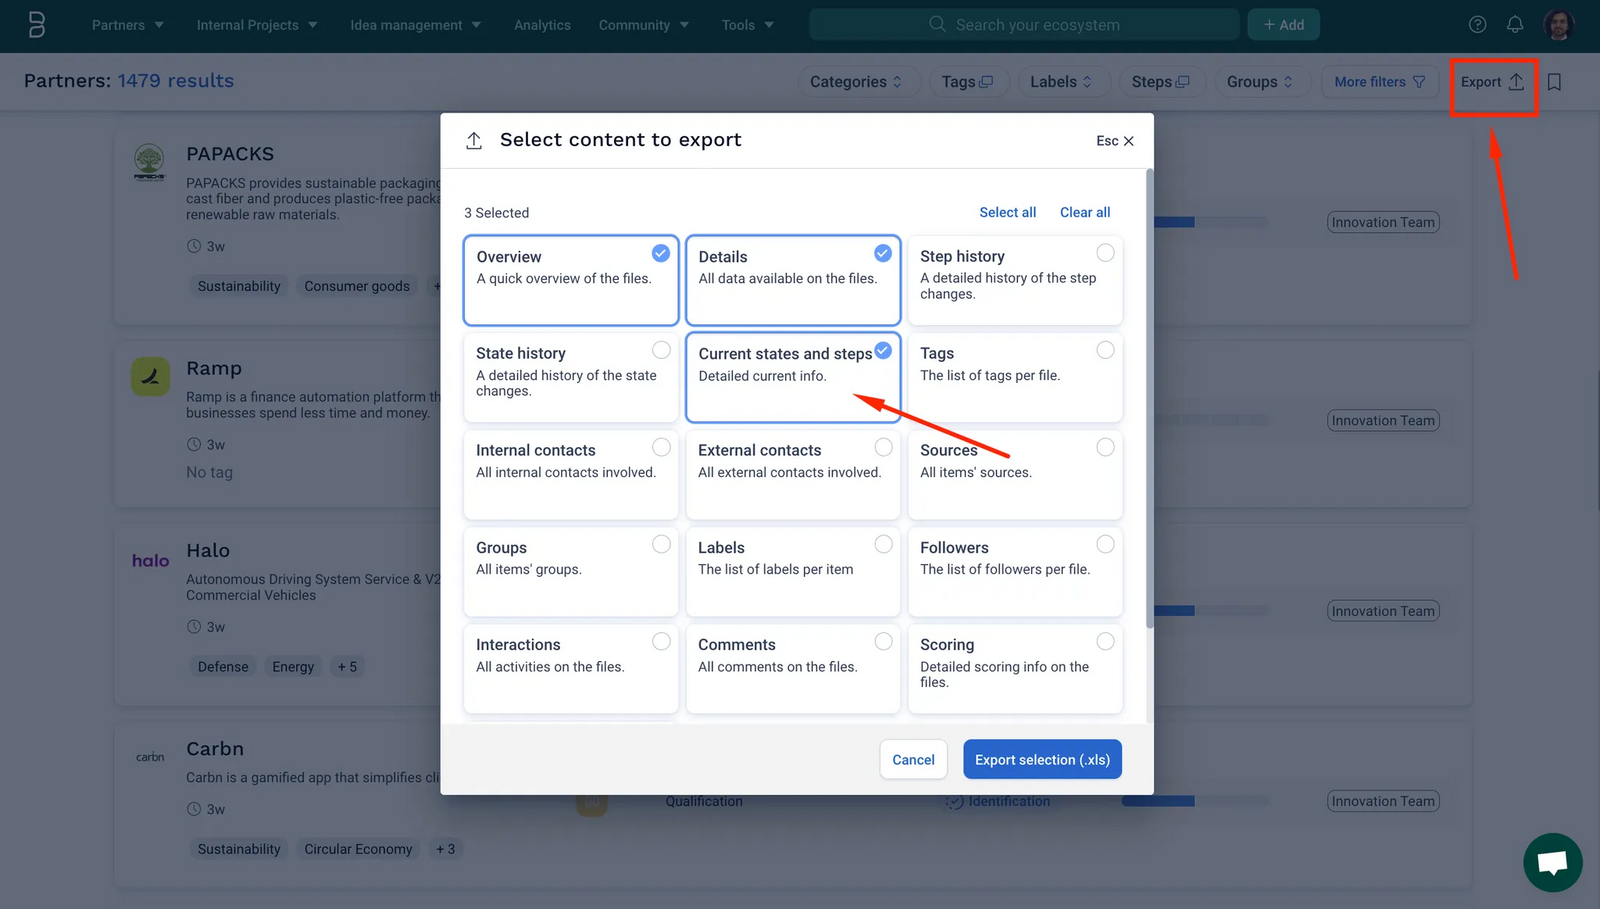
- Export Portfolio Information:
a. Navigate to the portfolio view on Bloomflow and export the "Current steps and states" for the relevant items as an Excel file.
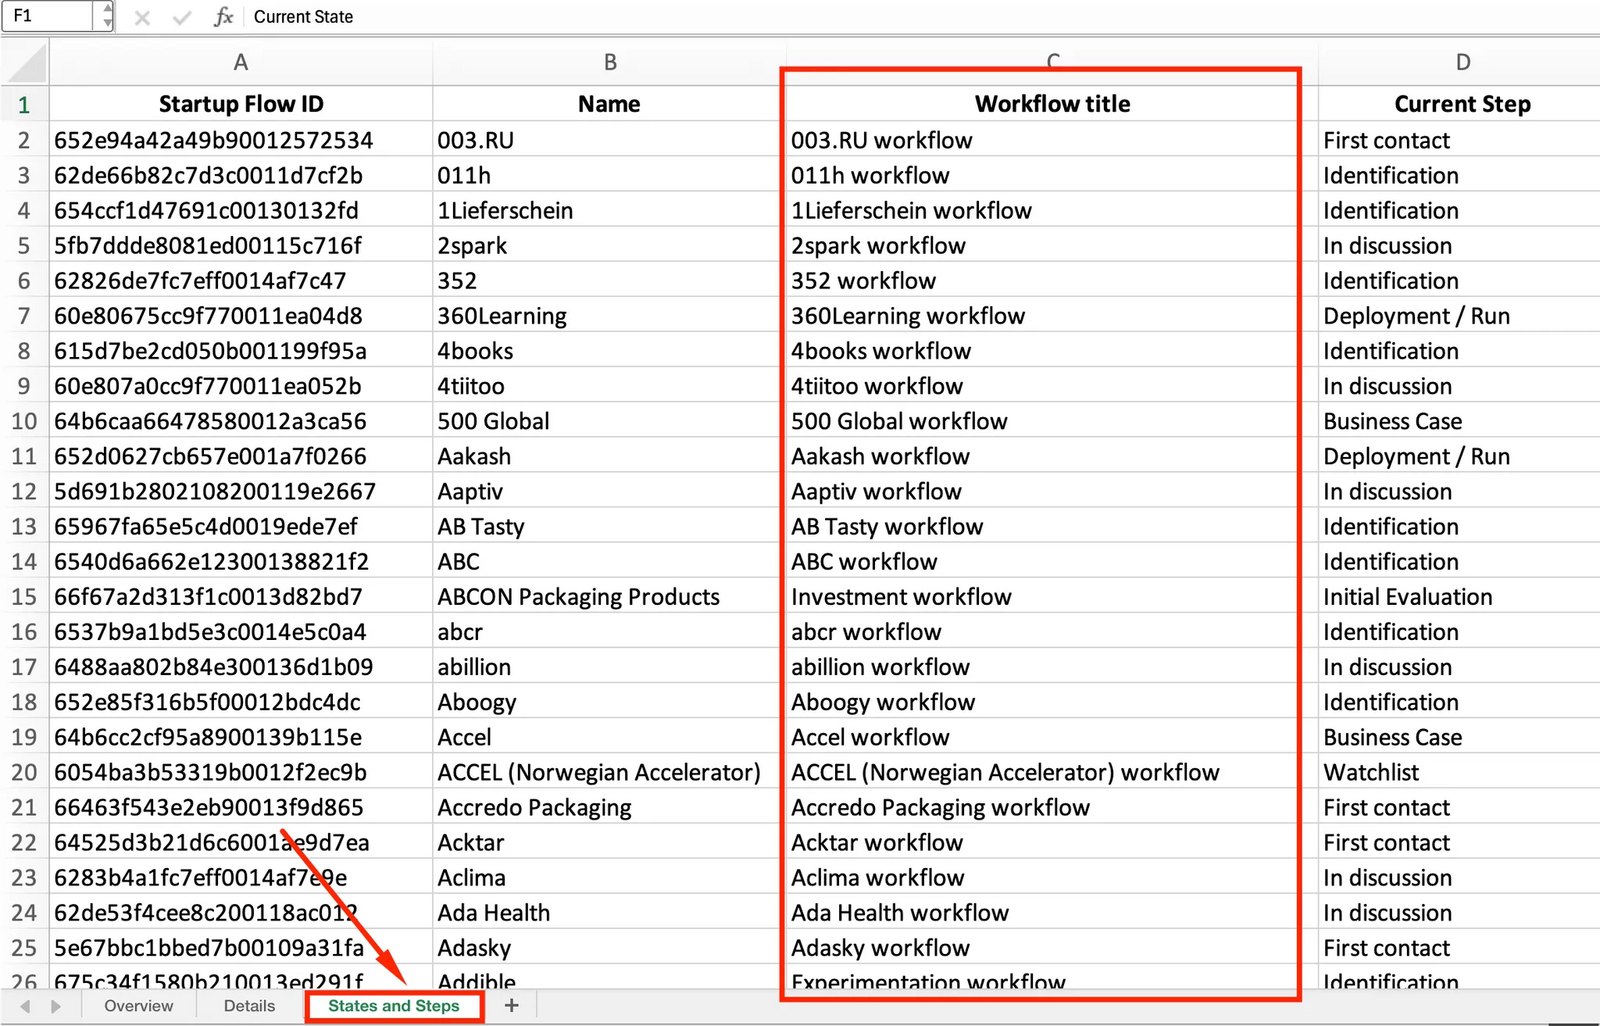
b. Once downloaded, the Name and Workflow Title columns in the "States and Steps" sheet will be particularly useful for preparing your data for import, along with other current workflow details to be updated.
7. Adding new workflows to existing partners [Update existing items]
Scenario
Your organization is onboarding a new team on Bloomflow, with its own framework for qualifying external partners. You need to assign additional workflows for this team to certain partners already in Bloomflow, without altering their existing workflows.
Steps
- Prepare Your Data
Once you have identified partners that are relevant for the new team being onboarded, create an Excel file with the following columns:
- Name (required; identifies the existing partner)
- The six fields that make up Workflow info:
- Workflow Name- required; should be different from already existing Workflow Names on the partner
- Workflow Template, Workflow State and Workflow Step- required for creating new workflows
- Groups- optional but recommended; can be used to store the info about the relevant team being onboarded
- Workflow Step Comment- optional
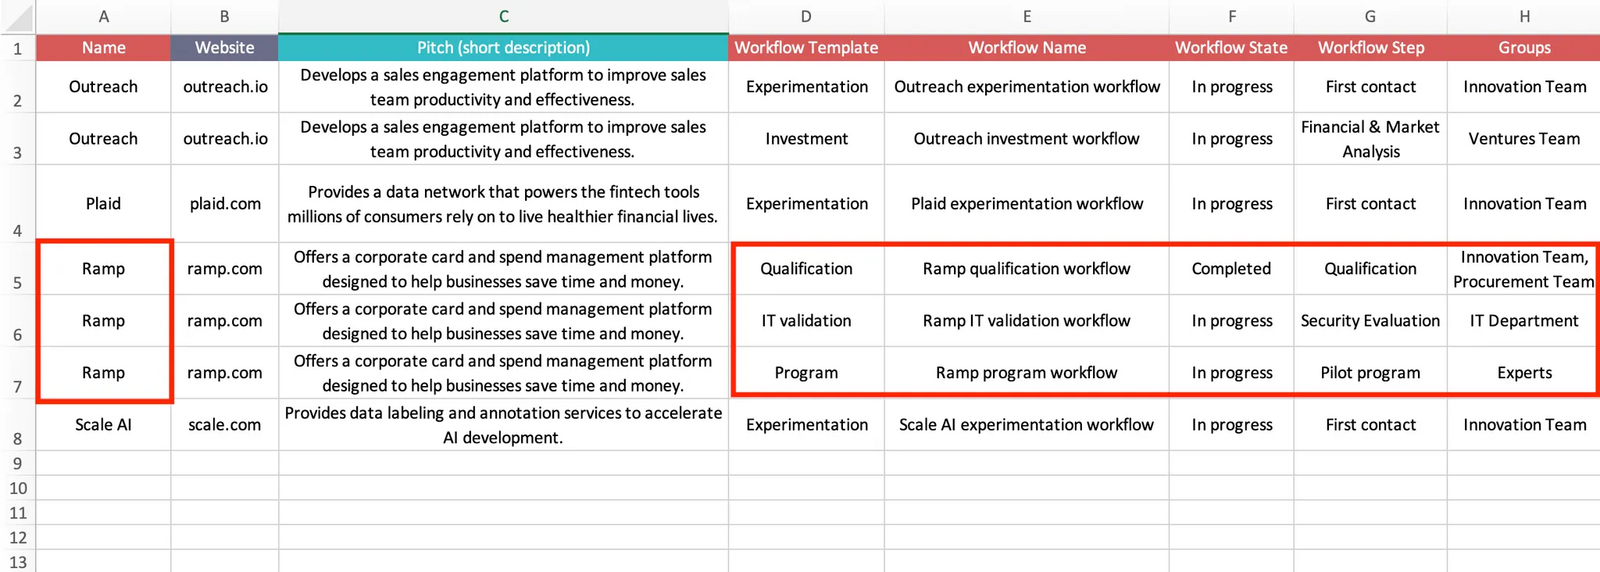
If you're using a template downloaded from Bloomflow, consult the Workflows appendix sheet to find the predefined Workflow Templates, Workflow States, Workflow Steps and Groups configured for your typology.
- Initiate Import
Go to Import Center > Import. Choose the appropriate typology ( Startups), select the Update existing operation and upload your Excel.
- Map and Validate
- Map Name and all workflow-related columns on the Mapping screen.
- Mark any non-relevant columns as Ignore for this import.
- Address warnings or errors flagged during the validation step, including those related to Workflow fields.
Notes on workflow-related validations for adding new workflows to existing items:
>> Records flagged as Ready to be updated match existing items by Name. If Workflow Name also matches, they are marked with a Warning - others in the Validation summary and and a Bloomflow comment in the Validation report: Match on Bloomflow - Workflow Name. Note that updates are applied to these records.
To add new workflows, ensure Match on Bloomflow - Workflow Name warning does NOT appear for those records.
>> Duplicate records with the same Name and Workflow Name in the import file are not permitted.
>> A Workflow State cannot be marked as completed unless it has reached the final step in its workflow. </aside>
- Complete and Review
- Once the import is complete, review the Post-import summary for details on successful and unsuccessful records.
- Confirm that new workflows have been added to the relevant partners in your portfolio.
8. Create/Update partners when multi-workflow is not activated
Scenario
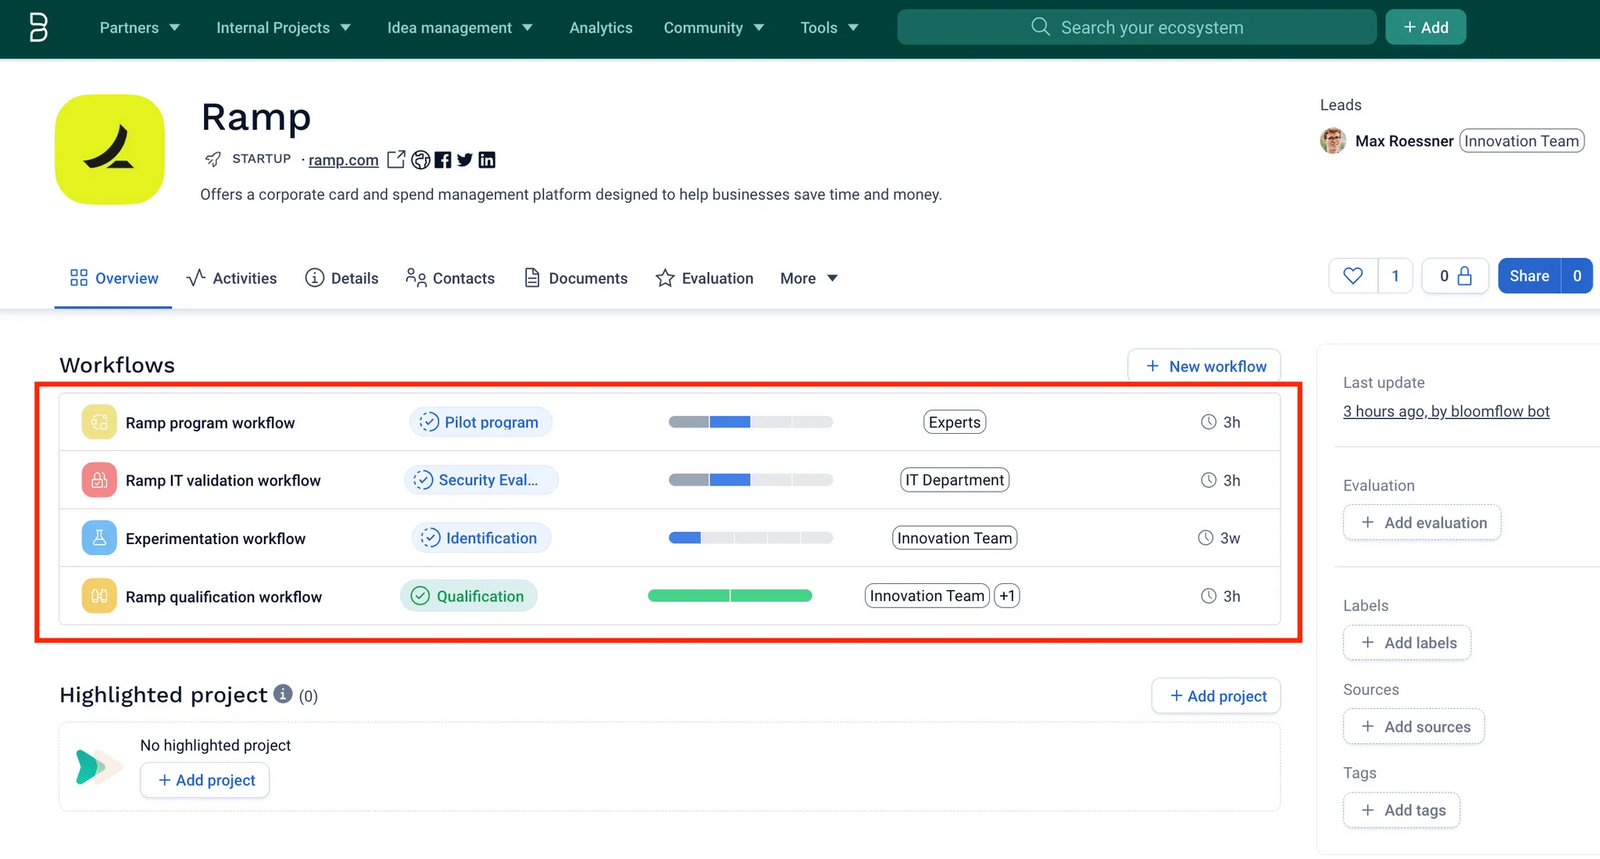
You are not using the Multiworkflow functionality for partners on Bloomflow. Even though Workflow Names and Workflow Templates may not appear visibly for partners in the platform, they remain essential for creating or updating partners via import.
Steps
- Prepare Your Data
Customize a template from the Import Center to include the fields relevant to your import.
For Creating New Items:
- You must fill in the Workflow Name and Workflow Template fields in addition to other mandatory fields, such as Name.
- Tip: Use
{Partner name} + “ workflow”as the Workflow Name for consistency.
For Updating Existing Items:
- Only Name is mandatory along with the fields you wish to update.
- If updating workflow-specific fields, you will need to include:
- Name
- Workflow Name
- The workflow field(s) being updated.
- Refer to this guide to locate Workflow Names for existing items.
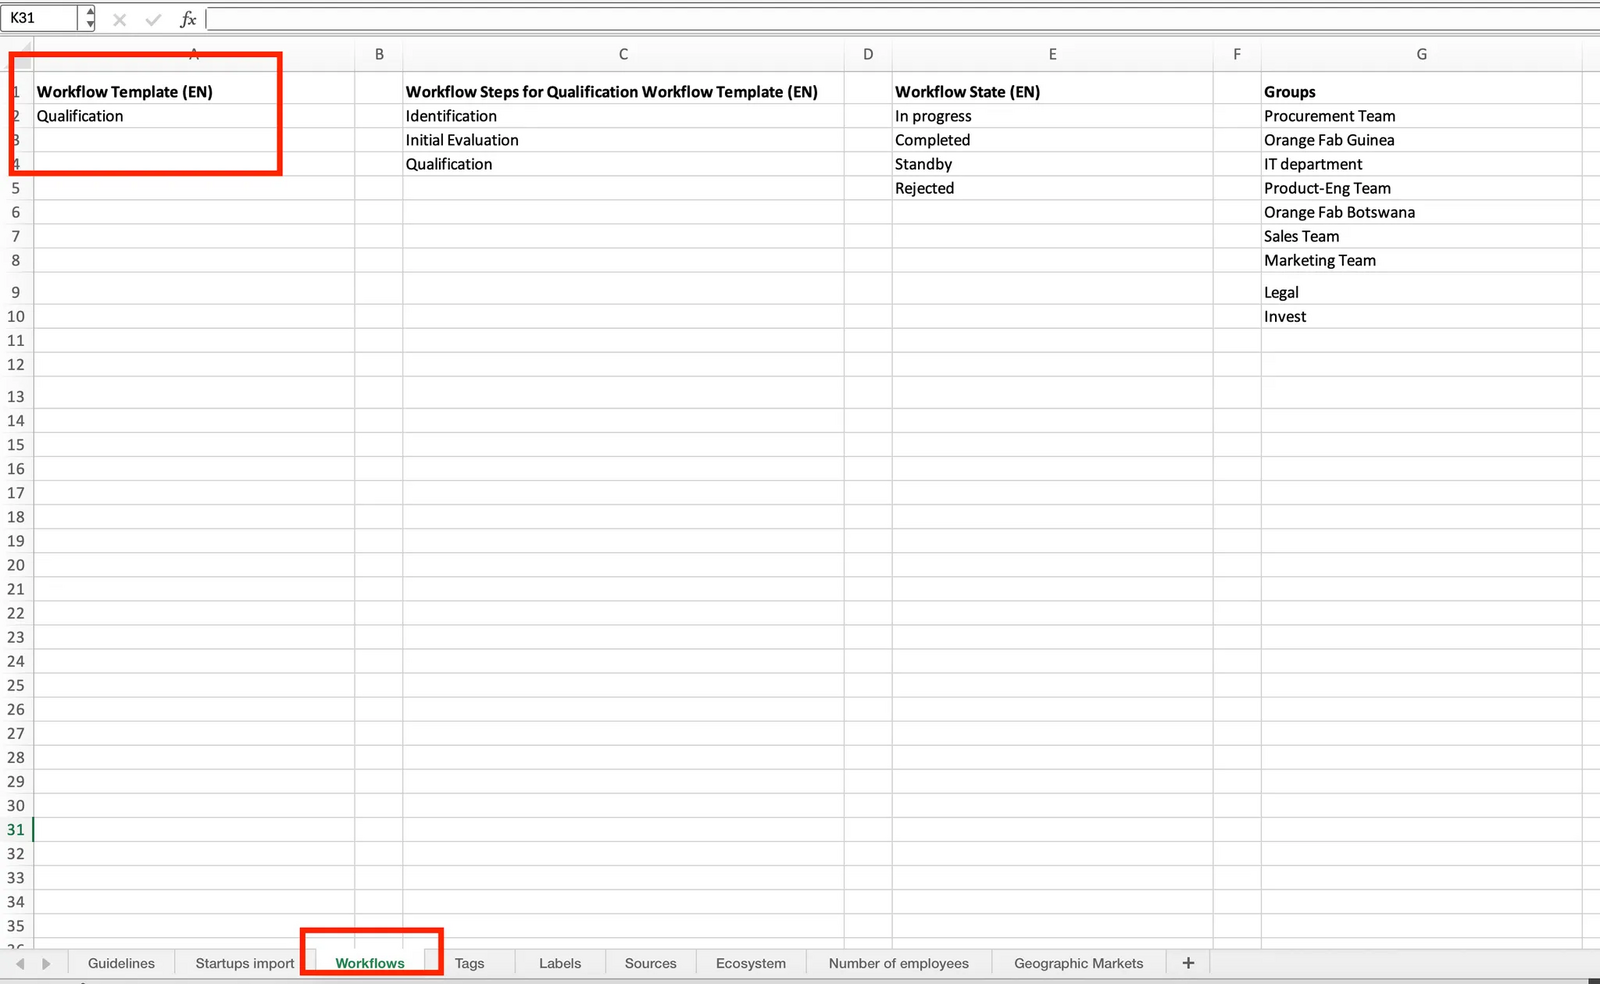
When needed, you can find the Workflow Template in the Workflows appendix sheet of the import template generated from the Import Center.
For more details, refer to the first two steps in the Overall Flow.
- Initiate Import
Go to Import Center > Import. Select the relevant Partner typology, choose the Create new or Update existing operation based on your needs, and upload your Excel file.
- Map and Validate
- On the Mapping screen, ensure that the fields are mapped correctly, especially the mandatory fields.
- Mark any columns you do not wish to import as Ignore for this import.
- Resolve any warnings or errors raised during the validation step.
- Complete and Review
Once the import is complete, review the Post-import summary for details on successful and unsuccessful records.
Comments
0 comments
Please sign in to leave a comment.